Topic: Bearing Triangulation
Teacher Resources:
Printable PDF Version of this Lesson Plan
Downloadable PPT of Lesson (33mb)
Primary Goal : Introduce students to the history of charts and maps and how they are used today
Topic: Bearing Triangulation
Primary Goal : Students will learn how to determine their location by triangulation. They will accomplish this by taking bearings of surrounding objects. This lesson will build on their work with the hand-bearing compass and demonstrate one of the primary uses of a compass.
Lesson Objectives :
· Understand the reasons why you would need to determine your location
· Understand how you would use a compass to take bearings of objects around you
· Learn how to transfer those bearings onto a chart using navigation tools
Lesson Outline :
I. Piloting
a. This is a great opportunity to give an overview of the 3 different types of navigation
i. Electronic Navigation – used inland but critical offshore
ii. Celestial Navigation – used primarily offshore
iii. Piloting – the use of landmarks, aids to navigation, soundings to navigate a boat while operating along the coast or near land
b. Chapman gives a great explanation of piloting as both a science and an art (Chapter 16)
i. Science – uses math principles based on centuries of observation, analysis, and study
ii. Art – interpretation of observations and other information require individual judgment and skill
c. In this lesson we first go over the math and science of triangulation, and then build skills through the practice of taking bearings to determine our location (introduce fix)
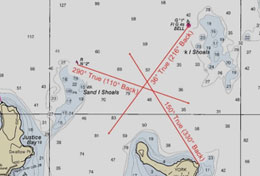
II. Triangulation
a. This is the process of pinpointing your location by taking bearings from 3 remote points
b. Each of these bearings are considered a Line of Position or “LOP”
c. What happens if you have only 1 LOP?
i. This means that your location could be anywhere along this line
d. What about 2 LOPs?
i. This is more precise because it tells you where your location might be along your first LOP
e. In order to get an accurate fix you should get 3 LOPs which should create a triangle
i. This triangulation tells you that your location is somewhere within the triangle
III. Triangulation Quality & Reliability
a. After plotting your 3 bearings (or LOPs), what if your triangle is very big?
i. This is unreliable, as it means you could be anywhere within the triangle
ii. You must take another bearing
b. What if 2 of your bearings are from the same location?
i. This results in shallow angles and makes it difficult to achieve an accurate fix
ii. If possible you should use 3 objects at 60 degree angles
IV. Obtaining a fix
1. Using your magnetic compass, take a bearing from yourself to a landmark in your vicinity (ensure that this landmark is on your chart)
2. Find the landmark on your chart, and draw a line (LOP) from the landmark using the inverse of your bearing
a. This is done using the compass rose on your chart, and a slide ruler (make sure you use the inner circle for magnetic)
3. Find a second landmark and take a bearing using your magnetic compass
a. Plot on your chart and ensure that the 2 lines intersect
4. Find a third landmark and repeat the previous steps to determine your location
V. What type of landmarks or objects should you use?
a. Objects or landmarks that are affixed (lighthouse, water tower, bridge span, day markers)
b. Objects that are far away
i. The closer you are to an object, the harder it is to get an accurate bearing
c. Are buoys good for obtaining an LOP?
i. Not ideal because many buoys move with the current
ii. But, buoys can be used if they are your only option
Supplemental Resources :
YouTube Video by Nautica : https://www.youtube.com/watch?v=V8j00E89Bq4
Exercises/Activities :
Provide the students with charts and navigation tools to complete the 3 exercises at the end of the PPT.
![]()