by Captain David Bill
Nautical Sciences Teacher at Tabor Academy, Marion Massachusetts.
We developed this hands-on learning “game” to give students the opportunity to put into practice those concepts underlying sail theory. As teachers of sailing, we are all aware the conventional “Points of Sail” diagram with the wind arrow at the top of the page and close hauled, close reach, beam reach, etc. labeled on the diagram with wind angle and appropriate sail setting. I would still use this diagram in my introduction to the Spin the Boat/Wind game. A brief introduction to the points of sail, wind angles, what tack the boat is on, tacking, gybing, irons, no-go zone, etc.
You will want to provide to your students a brief fundamental introduction ( there are lots of good You Tube videos available ) about the physics of how a sailboat sails across, toward and away from the wind.
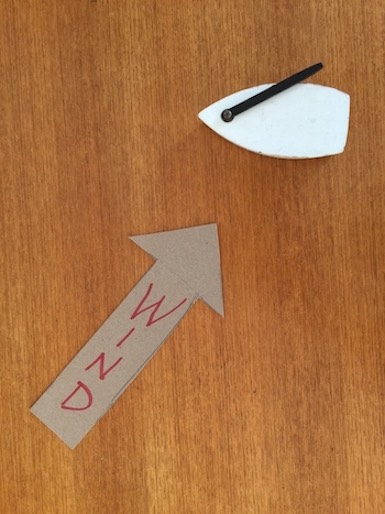
The “Spin the Boat, Spin the Wind” exercise puts these concepts into reality. The game is simple and can be accomplished anywhere. All that is needed is a wind arrow and a boat model with an adjustable sail. You can be creative with both of these. We use a cardboard arrow labeled “WIND.” In a pinch, I have used a dry erase marker with the colored cap being the point of the arrow that flies before the wind, showing wind direction. Sometimes I will set up a house fan with an extension cord; moving the fan around to model different wind directions. For the boat, we use a simple boat model (pictured above) where the sail can be adjusted to the point of sail. You could also make a simpler version with cardboard from a cereal box.
Put both of your props on a table and spin the wind… This becomes your wind direction. Now, spin the boat… this becomes your boat direction relative to the wind. You can take the Points of Sail diagram and orient it with the wind arrow on the table. Explain the outcomes for this scenario, provide the answers for this scenario, and demonstrate using the models and the Point of Sail Diagram.
Questions to Ask:
- What tack is the boat on? Why? Demonstrate.
- What is the relative wind angle? Demonstrate.
- If this is the relative wind angle, then what Point of Sail is the boat on? Demonstrate.
- If you were on this point of sail what direction would you turn the boat to tack. Demonstrate.
- If you were on this point of sail, what direction would you turn the boat to gybe. Demonstrate.
- If you were on this point of sail, how would you turn the boat to be in “irons”? Demonstrate.
- How would you set the sails for this point of sail? Why? Demonstrate.
Spin the boat, Spin the wind again.
Run through as many scenarios as your group needs. Now it is time for the students to try one at a time with the others observing. Ask for a volunteer and then let them walk through the scenario answering the above questions. Help them if they get snagged.
This exercise provides a fun, hands-on way to conceptualize and experience sailing theory before you enter a boat, or even if you don’t have access to a boat.After eight years of teaching this class, the result is that there is a waiting list to get in. Sometimes a student must wait patiently for two or even three years in order to get a spot in this class.
My students tell me that it is their most challenging class (but also favorite) because they have to think and problem solve on their own. Here is a short video showing us playing the game: